Saturday, November 4, 2017
Central Bucks Bike Club Thursday Night Ride
I lead a ride on Thursday nights (on the Canal Tow Path) from 630pm to 8pm on River Rd. near Pt. Pleasant, PA (not NJ). The GPS address is: 4788 River Rd (Rt 32), New Hope, PA. The start/finish is in the parking lot across the street of a former hotel/restaurant (forget the name).
I ride my Mountain Bike but most people ride either a hybrid road bike or a cyclo-cross bike. I have a hybrid bike but I ride the Mountain Bike because I get a better workout since the Coefficient of Drag (Cd) is much higher on a mountain bike than it is on a hybrid/road bike. That's because the mountain bike is heavier, wider more agressive tires, has a suspension system, etc. Do you need a mountain bike? Nope, that is until it snows. I'd rather ride a mountain bike in the snow than a hybrid or road bike. In fact, I'd rather ride a Fat Tire bike in the snow but I don't have one. And, the plan is to ride throughout the Winter on Thursday night.
What's the route? The ride starts on the PA side of the River near Pt. Pleasant and heads Northwest on the canal/towpath up to the Uhlerstown Covered Bridge. At the Covered Bridge we get off the canal/towpath and head down Uhlerstown Rd. to River Rd. We're on River Rd. for no more than 100 yds. when we cross the bridge over the Delaware River into Frenchtown, NJ. Once in Frenchtown, we re-group at the Cafe on the canal/towpath for no more than a few minutes. From there, it's a straight shot (non-stop) to Bulls Island and I mean a straight shot. Once at Bulls Island we cross the walking bridge across the Delaware River to the Black Bass Inn. Once across the River, it's no more than 100 yds. up River Rd. until we're back on the Canal/TowPath. From there it's no more than 1.2 miles back to the Start. The route is 19 miles long and flat and at the speed we average makes it a 1.5 hr. ride- on the button. I don't believe there is more than a 50 ft. elevation rise/drop the entire ride. The PA side is mostly single track with dirt/gravel. The NJ side is mostly double wide with gravel. The PA side has at least 4-5 bridges that you need to duck under the NJ side is void of any bridges.
What to bring? Lights. It's best to have two lights: 1 on the bike and 1 on your helmet. The disadvantage of only 1 light on your bike is that it only lights up where your bike is pointed. You can't see in the woods and if you have a bike computer you can't see that either. What else? A helmet. I know it's only the canal path but it's just as easy to fall on the canal path as it is the road. And, when the ground freezes, it's just as hard as the road. Besides, at night the tow path/woods come alive and there are all kinds of critters (big and small) on the Canal/Tow Path. So far on every ride we've had deer jump out in front of us. Also, if you go off the Canal/Tow Path for whatever reason, you've got the canal on one side and a drop-off in some cases of over 30 ft. into the Delaware River (or on rocks) on the other side. The Canal/Tow Path is only 12 ft. wide in some spots on the PA side. The NJ side is much wider. A snack/drink is advisable even though it's only 19 miles. That's because we go at a pretty good clip...at least for me on a mountain bike..ha. The ride is advertised as 14-15 mph average, but there are times when we crank it up to 18-19 mph. And, dress warm.
Oh, one more thing, I just created a 3 mile segment on Strava on the NJ side. Right now, my time is 11 minutes and change...for normal riding. I hope to improve on that time each week throughout the Winter. I'd like to get that time down to 10 minutes- or just under 10 which I believe is an 18 mph average.
Come join us on Thursday night. Power ON! Coach Rob
Paceline Etiquette & Safety
If you ride in a group, sooner or later you're going to be riding in a paceline on the flat sections of your group ride. And, as long as you're going to be riding in a paceline you might as well know how to do it properly from an etiquette & safety standpoint. Here are my tips/rules:
1. First and foremost, if you don't feel comfortable drafting closely behind the rider in front of you (and I'm talking 6-12 inches) then DON'T! If you touch the wheel in front of you, guess who is going down? Not the rider in front of you, YOU are. And, guess who else is going down? Everyone that is following closely behind you. So, again, if you don't feel comfortable stay in the back of the group and when riders that are done pulling up front slide back to the end of the paceline leave some room for them to get in- and tell them to GET IN.
2. Secondly, keep the pace. For every paceline there is an average speed. If you're paceline is averaging 25 mph, then maintain 25 mph. Don't accelerate or decelerate when it's your turn to pull. Keep a steady pace and look down at your bike computer to ensure you're maintaining 25 mph. Make sure you have an accurate bike computer on your bike that shows speed. You can't guess. Naturally, if the road goes uphill you most likely won't be able to maintain 25 mph so don't break your back trying to maintain 25 mph...20 mph may be fine. If you have a power meter on your bike and you were pushing 200w on the front to maintain 25 mph then continue to push at 200w on the hill.
3. Don't jam on the brake. That's right do NOT brake hard for any reason. If you have to adjust your speed in a paceline there's two ways to do it, the first I prefer is: move out of the slipstream or "air" brake. The second is to stop pedaling or soft-pedal (pedal w/ little to no resistance on the pedals). If you have to touch the brakes, then do just that, "touch" them or "feather" them, do not grab a handful of brake. If you brake hard it does nothing but cause a potential crash behind you. If you see a pothole that's too late to avoid- try to avoid it or if you have to go through it..but DON'T brake hard. Same with anything that runs in front of you like a squirrel, fox, deer, ground hog, dog, etc. Try to avoid it, if you can't- hit it! If you brake hard you're going to cause a crash behind you.
4. Keep your eyes ahead looking down the road. Try not to fixate on the wheel in front of you. If you do, you won't be able to react to riders in front of you that may be swerving to avoid obstacles. Yes, I know that you're only 6-12" from the tire in front of you but try not to stare at the rear tire in front of you. I like to draft just off the centerline of the bike in front of me. That allows me a better view down the road. I can see better and I can still benefit from the draft.
5. Point impediments out on the road. i.e. potholes, sticks, gravel, rocks, roadkill, black walnuts, etc. Don't be afraid to yell it out for all to hear. If there is a rider up or a car up, announce it. If there is a walker on the side of the road, announce it and signal it too. Also, if you're up front and you're slowing, for whatever reason, announce it- SLOWING.
6. Nobody says you have to stay out front and pull for any given amount of time. If you feel strong, stay out front for 2-3 minutes, if you're not feeling good, then perhaps only 1 minute is all you've got in the tank. When it's your time to pull-off do it gradually and noticeably so the rider behind you knows. A flick of the elbow will tell the rider behind you which direction you'll be pulling off to. Most often it's done to the left- that you pull off. When you do pull off, slowly drop back to the end of the paceline. If you're the last rider in the paceline, tell the rider that is slowly drifting back that you're the last rider so they can safely get in behind you. I've been in pacelines that were moving at close to 30 mph and if you didn't know where the last rider was in the paceline you risked missing the draft and getting unhitched. And, good luck trying to catch back up to a paceline averaging 30 mph.
7. If you're in a paceline and you're really gassed (beat) nobody says you have to pull every rotation. If you don't want to pull, or you want to skip a turn, when the rider that pulled off is slowly drifting back leave them some room to get in between you and the rider in front of you and tell them- GET IN!
Power ON! Coach Rob
Friday, November 3, 2017
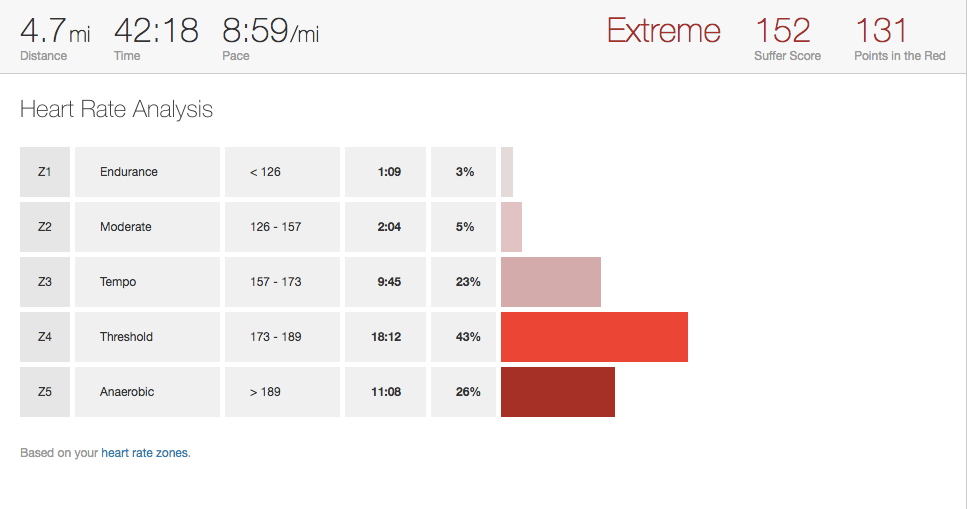
Suffer Score
SUFFER SCORE
One of the better metrics that Strava (premium) produces is "Suffer Score". I briefly described what Suffer Score was in a previous post, but I found a better description/explanation below (from Strava):
Strava Suffer Score
The Strava Suffer Score is an analysis of your heart rate data and is available on Strava as a Premium feature. By tracking your heart rate through the ride or run, and its level relative to your maximum heart rate, we attach a value to show exactly how hard you worked. The more time you spend going full gas and the longer you ride, the higher the score. Compare your Suffer Score with friends and pros, see if you can do a truly epic ride and motivate yourself to push that extra bit harder! The Suffer Score was inspired by the concept of TRIMP (TRaining IMPulse) developed by Dr. Eric Banister.

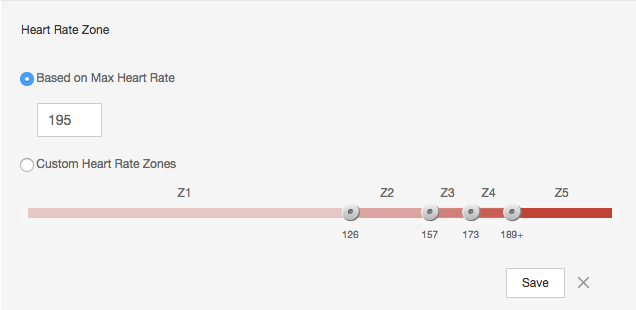
By default, we determine your heart rate zones by estimating your max heart rate based on your age. While this works for a large number of athletes, it may not work for you. For those athletes who know their specific heart rate zones we allow you to customize them to fit your specific physiology.Enter your Max HR in your Profile Settings to get the most Accurate Suffer score. You can also Customize your Heart Rate zones in your Profile Settings by selecting Custom HR zones and sliding the zone endpoints along the scale:

Suffer Score Values
Activities with a Suffer Score of 100 to 150 will be classified as "tough;" those with a Suffer Score of 151 to 250 are "Extreme;" and those with a suffer Suffer Score above 250 are "Epic."
Points in the Red
Points in the Red is the portion of your Suffer Score that you earned in your Zone 4 and Zone 5 heart rate zones. Points in the Red shows you the intensity of your workout — if your Suffer Score and Points in the Red are the same, you were hammering the entire time!
The benefits of drafting!
I've always wondered how much drafting helps/assists you while you ride. And, particularly, I always wondered at what speed you had to be riding for you to notice the effects. Lets discuss the former first. There is no doubt that drafting helps save/conserve energy while riding. How much? Well that depends. That depends on the terrain, the wind velocity and direction, the person (or vehicle) you're drafting and how closely you follow the guy/gal you're drafting.
Let's assume for now, that you're riding on a flat road with no wind. So, the only resistance or drag is the coefficient of drag (Cd) that you feel head on from the still air/wind. I don't have a graph/chart showing the energy savings at different speeds but there is no doubt the faster you go the more energy savings there is. For example, there may be a 40% savings in energy when you're drafting at speeds approaching 30 mph while the savings may diminish to 20% at 20 mph. I'm not sure if the relationship is linear or not. I'm guessing it's pretty close. I can tell you (from experience) that I've been nearly sucked along in the middle of the pack of a 1 mile loop Criterium that averaged 27 mph. I'd say I was averaging no more than 200w maintaining that speed in the middle of the pack. When I was out front of that same Criterium, I've noticed my power output closer to 300w. That's a 50% increase. I've also moto-paced before (behind a motorcycle) at 30 mph and had an interval workout called "pop-outs" where I drafted behind the moto then "popped-out" into the windstream. What a difference? I didn't have a power meter at the time, but I'll bet there was a huge power difference.
What is the magic speed that you need to achieve to take advantage of the energy savings from drafting? Before I try to answer that question, lets make a few assumptions: 1) again the wind/air is still 2) we're on a flat road 3) we're drafting a 6 ft. tall 170 lb rider (trust me, the bigger the rider in front of you the better the drafting advantage or energy savings) and 4) we're drafting at approximately 1 ft. behind the wheel in front of us (no more no less). The further away you are from the rider in front of you the lesser the advantage. From my experience, and from others experience that I've read online, you can benefit at speeds as low as 12-15 mph. Albeit, the benefit is small, lets say 10%. But, I don't notice a benefit until at least 16-17 mph and that benefit is small. I'm guessing a 20% energy savings at that speed. Where I notice the biggest benefit is over 20mph. Again, keep in mind, if I'm drafting a big guy that is 6'4" vs. a gal that is 5'4" I'm going to notice a bigger energy savings with the big guy.
So, the next time you're riding in a group and you're riding in the middle, sucking the wheel in front of you, just remember that you're not doing nearly as much work as the guy out front. i.e. you're not as strong. Don't forget to thank the guy out front after he pulls too. After all, it's hard work out front..but then again, some of you "wheel suckers" out there would never know that since you spend all of your time in the middle of the pack just to say you rode with the Big Dogs!
I'll try to find more accurate numbers in the weeks ahead and I'll revisit this blog. I think it's good information to know.
Until then, Power ON! Coach Rob
Wednesday, November 1, 2017
Golden Cheetah
When I became an USA Cycling Level 2 Power Based Coach, I used WKO+ 3 from Training Peaks Software exclusively for post-ride analysis. I gave up on WKO+ 3 recently because my NEW ErgVideo software now saves my Computrainer training files in *.FIT format instead of *.TXT format. Training Peaks WKO+ 3 doesn't read *.FIT files it only reads *.TXT files. You have to upgrade to WKO+ 4 either as a monthly subscription or buy the software outright for $179 to read *.FIT files. I think $179 is way too much $$ so I emailed Training Peaks and the best they could do was to offer me a 10% discount. So, now, I've punted on Training Peaks software and I'm using the Open Source (Free) Software called Golden Cheetah. I heard of Golden Cheetah years ago but I never looked at it because Training Peaks software did the job. Besides, if you bought the book by Hunter Allen and Dr. Andrew Coggan (like I did), Training and Racing with a Power Meter", it shows you how to read and work with all of the metrics that Training Peaks Software uses/offers.
Having downloaded and used the latest version of Golden Cheetah, I have to say it's a damn nice software program (for Free). The best part is, it reads all of my files including my *.FIT Computrainer Files and my Garmin bike computer files. And, Golden Cheetah has just as many metrics for post ride analysis as Training Peaks Software does- maybe more. The terminology might be a tad different, for example, Training Peaks Software calls your maximum sustained average power at Threshold your Functional Threshold Power (FTP) where Golden Cheetah calls it your Critical Power (CP). Unlike Training Peaks Software, Golden Cheetah lets you create and customize your own performance charts. You want to look at HR vs Power, create a chart and you've got it.
Don't take my word for it, check it out and download Golden Cheetah for Free. If you don't like it after using it, then erase/delete it. No loss. Training Peaks will tell you that it's not well supported but that's BS. Golden Cheetah has a nice Help menu with documentation to support all of their charts/graphs. It also has a user forum that will help you with any questions you have. You can't beat it. http://www.goldencheetah.org/
Power ON! Coach Rob
Having downloaded and used the latest version of Golden Cheetah, I have to say it's a damn nice software program (for Free). The best part is, it reads all of my files including my *.FIT Computrainer Files and my Garmin bike computer files. And, Golden Cheetah has just as many metrics for post ride analysis as Training Peaks Software does- maybe more. The terminology might be a tad different, for example, Training Peaks Software calls your maximum sustained average power at Threshold your Functional Threshold Power (FTP) where Golden Cheetah calls it your Critical Power (CP). Unlike Training Peaks Software, Golden Cheetah lets you create and customize your own performance charts. You want to look at HR vs Power, create a chart and you've got it.
Don't take my word for it, check it out and download Golden Cheetah for Free. If you don't like it after using it, then erase/delete it. No loss. Training Peaks will tell you that it's not well supported but that's BS. Golden Cheetah has a nice Help menu with documentation to support all of their charts/graphs. It also has a user forum that will help you with any questions you have. You can't beat it. http://www.goldencheetah.org/
Power ON! Coach Rob
PowerCal HR monitor/power meter
When a new product comes out that I think has some merit or that I flat out like, I review it here. I was one of the first riders in my area to ride/own a power meter. I was also the first USA Cycling Coach in the tri-state area (Pennsylvania/New Jersey/Delaware) to be Power Based certified. I've been riding/training with power for over 20 yrs. Back in 1995, when I started riding competitively (Triathlons) there was really only one bonafide power meter on the market and that was the SRM Power Meter made in Germany. I believe it cost between $2000 and $3000 dollars and was only available to professional riders/coaches/etc. Even if it was available to the average Joe, who could afford a $3000 power meter on their bike? I know I couldn't. Today, there are at least a dozen manufacturers of power meters that are hub based, crank based, chainring based, opposed force, etc. These power meters start at $300 (Velocomps Power Pod), which is still a lot of money for the average Joe. Generally, the more expensive the more accurate they are. I own and ride three Power Meters: (2) made by Power Tap that are hub based and used on my road bikes and (1) made by Velocomp that is opposed force (wind) based used on my Time Trial bike. The opposed force Power Meter is/was used to calculate Coefficient of Drag to become more wind resistant during Time Trials.
So, what is the PowerCal HR monitor/power meter? I'll let you watch a short video by Dr. Allen Lim which best describes it:
https://www.powertap.com/product/powertap-powercal
The important thing to note from Dr. Allen Lim's video is that the PowerCal is NOT a power meter nor does it claim to be as accurate as one. I'd call it a HR monitor on steroids. The PowerCal's got a built in algorithm that converts HR signals into estimated power output. It gives you a ballpark power reading of a steady state effort on the bike. It is not useful for measuring power output of short or intense intervals due to the heart rate lag.
Also, here's an excellent review by DC Rainmaker:
https://www.dcrainmaker.com/2012/11/cycleops-powercal-in-depth-review.html
For me, it's better than nothing and definitely in the ballpark as far as money is concerned- just north of $100. That works for me. The PowerCal is ANT+ and Bluetooth compatible so you can download your ride (with power) from your Garmin Edge (which talks to the PowerCal via ANT+ technology) into either Garmin Connect or Strava. Or I'm sure there's an App for the iPhone or Android where you can read the input/output live via Bluetooth technology on the phone.
My PowerCal arrives in 2 days. When it does, I'll give a more in-depth review and include the Pros and Cons. I'm not expecting much from the PowerCal. Like I said, it seems to me to be nothing more than a glorified/beefed-up HR monitor that converts HR to estimated Power. And, that's all I want at this point because I don't feel like shelling out $500 for another Power Meter for use on my Mountain Bike or when I'm in the gym on a spinning bike.
Until then, Power ON! Coach Rob
So, what is the PowerCal HR monitor/power meter? I'll let you watch a short video by Dr. Allen Lim which best describes it:
https://www.powertap.com/product/powertap-powercal
The important thing to note from Dr. Allen Lim's video is that the PowerCal is NOT a power meter nor does it claim to be as accurate as one. I'd call it a HR monitor on steroids. The PowerCal's got a built in algorithm that converts HR signals into estimated power output. It gives you a ballpark power reading of a steady state effort on the bike. It is not useful for measuring power output of short or intense intervals due to the heart rate lag.
Also, here's an excellent review by DC Rainmaker:
https://www.dcrainmaker.com/2012/11/cycleops-powercal-in-depth-review.html
For me, it's better than nothing and definitely in the ballpark as far as money is concerned- just north of $100. That works for me. The PowerCal is ANT+ and Bluetooth compatible so you can download your ride (with power) from your Garmin Edge (which talks to the PowerCal via ANT+ technology) into either Garmin Connect or Strava. Or I'm sure there's an App for the iPhone or Android where you can read the input/output live via Bluetooth technology on the phone.
My PowerCal arrives in 2 days. When it does, I'll give a more in-depth review and include the Pros and Cons. I'm not expecting much from the PowerCal. Like I said, it seems to me to be nothing more than a glorified/beefed-up HR monitor that converts HR to estimated Power. And, that's all I want at this point because I don't feel like shelling out $500 for another Power Meter for use on my Mountain Bike or when I'm in the gym on a spinning bike.
Until then, Power ON! Coach Rob
Micro and Macro View
When it comes to post-ride analysis, there are only two metrics that are important: 1) is within the micro view where you look at the individual ride specifics metrics of speed, power, heart rate and cadence and 2) is within the macro view where you look at multiple ride specifics of fitness, form and fatigue. Let's take a look at the micro view of an indoor trainer ride last night and the take-away from that workout:
The micro view includes max and average values for Speed, Power, Heart Rate and Cadence. The first 20 minutes of the ride was nothing more than a warmup in the L2 (endurance) Zone. This is a zone where you should be able to ride all day long and just about break a sweat. At the 23:20 mark, a series of 6x1 @ L3/L4 (Sweet Spot) intervals w/ 20s RI commences. That is six intervals of 1 minute each in the "Sweet Spot" Zone with rest intervals of 20 seconds between each interval. Normally, intervals like this would be performed in the L5 Zone (VO2max) during the regular season because the intervals are so short in duration. But, since this is the off-season, and I only have 1 day off of rest before I have a tough ride, it was good enough a workout to keep the legs fresh without fatiguing them. (More on this in the Macro view.) What's also interesting to note is the saw-tooth pattern in the Speed, Power and Cadence profile during the intervals- most evident in the Power profile. What's important when doing intervals is that the peak power of each interval is the same for the first interval through the last. You don't want the power peaks of each interval to decline. This will be harder to maintain during L5 (VO2max) interval workouts. But, it's vital that you try your best to maintain the peak power for optimum training results. You can also see how I ramped up the cadence from 80 rpm during the rest interval to over 90 rpm during the work interval. It makes it a lot easier (subconsiously) to pedal faster than it is to pedal harder. Remember, Power (watts)= Force (lbs) x Speed (rpm) You can either pedal harder or pedal faster to maintain power- or both.
The macro view has been discussed in past blogs. However, the important take-away from the following graph/chart is that I was able to maintain my Fitness and decrease my Fatigue after my workout. This is important because I have a tough ride coming in 2 days and only have 1 day of rest. If I had a hard/tough workout I would be Fatigued going into my hard/tough workout and wouldn't be able to ride as hard/strong as I'd like to.
The micro view includes max and average values for Speed, Power, Heart Rate and Cadence. The first 20 minutes of the ride was nothing more than a warmup in the L2 (endurance) Zone. This is a zone where you should be able to ride all day long and just about break a sweat. At the 23:20 mark, a series of 6x1 @ L3/L4 (Sweet Spot) intervals w/ 20s RI commences. That is six intervals of 1 minute each in the "Sweet Spot" Zone with rest intervals of 20 seconds between each interval. Normally, intervals like this would be performed in the L5 Zone (VO2max) during the regular season because the intervals are so short in duration. But, since this is the off-season, and I only have 1 day off of rest before I have a tough ride, it was good enough a workout to keep the legs fresh without fatiguing them. (More on this in the Macro view.) What's also interesting to note is the saw-tooth pattern in the Speed, Power and Cadence profile during the intervals- most evident in the Power profile. What's important when doing intervals is that the peak power of each interval is the same for the first interval through the last. You don't want the power peaks of each interval to decline. This will be harder to maintain during L5 (VO2max) interval workouts. But, it's vital that you try your best to maintain the peak power for optimum training results. You can also see how I ramped up the cadence from 80 rpm during the rest interval to over 90 rpm during the work interval. It makes it a lot easier (subconsiously) to pedal faster than it is to pedal harder. Remember, Power (watts)= Force (lbs) x Speed (rpm) You can either pedal harder or pedal faster to maintain power- or both.
The macro view has been discussed in past blogs. However, the important take-away from the following graph/chart is that I was able to maintain my Fitness and decrease my Fatigue after my workout. This is important because I have a tough ride coming in 2 days and only have 1 day of rest. If I had a hard/tough workout I would be Fatigued going into my hard/tough workout and wouldn't be able to ride as hard/strong as I'd like to.
Just a week ago, my fitness level was 18 and my fatigue level was 38. You can see that my fatigue level has dropped to 18 (almost half from last week) but yet my fitness level has been maintained at 17. That is how you get stronger. It's all about "impulse" (or dose) and "response". It's how your body reacts to the impulse...by getting stronger. So, the next time you give your body the same impulse or dose, it's better able to handle it either by being stronger (able to produce more watts at the same effort) or more efficient (lower heart rate for the same effort).
That's what it's all about- impulse and response. So basic a concept, yet so complex to optimize.
Power ON! Coach Rob
Sunday, October 29, 2017
Is dairy bad for you?
I can't say I'm a real dairy person. Other than the milk I used to put on my cereal each morning, and the occasional ice cream after dinner, I was pretty much void of milk or dairy products. Yes, I ate eggs occasionally on the weekend, maybe even had an egg salad sandwich for lunch during the week. And, I had to have cheese on a sandwich or hamburger- who doesn't? But, for the most part, I was void of dairy products. That is until I was diagnosed with Rosacea (a chronic skin disease) a couple years ago. Dairy products are known to stimulate the release of insulin and IGF-1 (Insulin-like Growth Factor) which contribute to acne, eczema & psoriasis and certain types of cancer like prostate cancer. So, I cut dairy completely out of my diet and I feel (and look) a lot better.
Here are some interesting facts about milk and dairy products:
- Humans are the only species that consumes milk in adulthood and the only species that consumes the milk from another animal.
- About 75% of the world's population is unable to break down lactose as adults, a phenomenon called lactose intolerance.
- Healthy fats and fat-soluble vitamins are not present in low-fat or skim dairy products, which are often loaded with sugar to make up for the lack of flavor caused by removing the fat.
- The great majority of evidence shows that dairy improves bone density, reduces osteoporosis and lowers the risk of fractures in the elderly (easily replaced by a calcium and vitamin supplement).
- Despite being high in calories, consumption of full-fat dairy is actually linked to a reduced risk of obesity. But, who consumes full-fat dairy these days? Hardly anyone. That's why low-fat and non-fat milk are the high sellers.
- Low-fat dairy (which is often loaded with sugar) seems to be a bad choice overall... the main metabolic benefits of dairy are due to the fatty components.
So, what are the dairy alternatives? As far as cheese is concerned there isn't an alternative. At least I don't know of any "tasty" alternative. If there is, let me know. It's just easier for me NOT to ask or put cheese on anything. As far as milk goes, I use Almond Coconut milk in my cereal and coffee. Does it taste as good as milk or creamer? Nope, I'm not going to lie to you. But, it's not that bad. Egg alternative? I don't know of any. I'm not worried about it though, I wouldn't say I eat more than 2 eggs per week. If you're concerned about not getting enough Calcium or Vitamin D (or other vitamins) by cutting out dairy, then use a supplement. Like eggs, same with ice cream. I have a kids size ice cream cone maybe once a month at Rita's or DQ- that's it. We never have ice cream (or ice cream treats) at home in the freezer like we used to. Outta sight outta mind.
Power ON! Coach Rob
Subscribe to:
Posts (Atom)