Monday, January 29, 2018

Training for your first Spring ride/race

It's Ground Hog day in a couple days.  Wonder what Punxsutawney Phil will predict for 2018?  Legend has it, if Phil sees his shadow and returns to his hole, there will be six more weeks of Winter-like weather.  If he doesn't see his shadow, we'll have an early spring.  Regardless of what Phil predicts, will you be ready for your first early Spring ride/race in March or early April?  If you just started training, I hope you're not planning on peaking until mid-May..because that's about how long it will take.  For those of you that started training the end of December or beginning of January, you're in better shape.

So, how do you prep for your first ride/race?  Do you do any indoor interval workouts?  Are they High Intensity Interval Training (HIIT) indoor workouts?  Are your rides long Tempo rides outdoors on the weekend?

Here's how I approach my first ride/race.  Since my first Gran Fondo type ride (I don't race anymore) is April 7, I count back from that day to today's date.  This tells me how much time I have left to train.  So, I have 67 days or a little over 9 weeks of training left.  The ride is an 80 mile ride with 6000' of climbing.  So, it's going to be a hilly ride.  And, since I anticipate riding at an average speed of 16 mph (including rest stops for something to eat/drink and to go to the bathroom), that means I'm going to be 5 hrs. in the saddle.  That's a long ride for early Spring since it's hard to get long rides in over the Winter.  (Normally, I don't do any century rides until Summer.)  Then, I look at the elevation profile of the ride (see below):


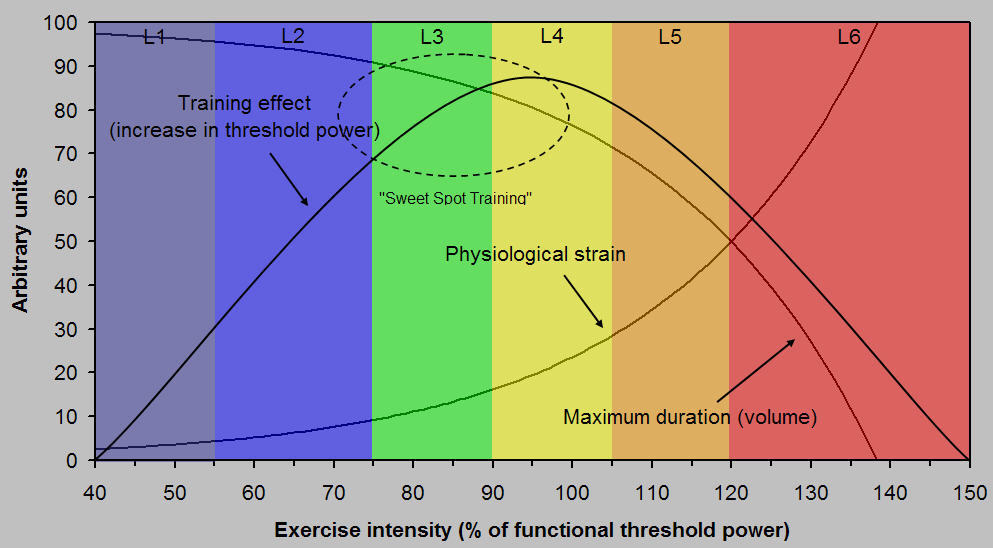
It looks like there are 13 distinct climbs over 200 ft. of elevation gain each.  And, the percent grade on some of the climbs is close to 15% (which is pretty steep).  The good thing is that most are short climbs between 1-2 miles long (which should only take 3-5 minutes to climb).  Those climbs will be in the L4/L5 power ranges which is Threshold/VO2max.  You'll need to generate that much power on 15% grades just to climb at 6-8 mph.  It looks like there's at least 5 minutes in-between climbs too, even though it looks like it's one climb after another on the elevation profile.  So, right away I'm thinking L4/L5 intervals with 5-10 minutes of rest in-between intervals.  In weeks 1-2 of training I'm looking at two interval workouts during the week: 1) a sweet spot interval workout like 2x10s or 2x12s and 2) an L4/L5 interval workout like 4x3 or 5x3.  On the weekends I'm going to ride a minimum 2 hr. Tempo ride with plenty of hills.  In weeks 3-4, I'm going to do the same interval workouts: a sweetspot and an L4/L5 workout.  This time I'm going to increase the duration to say a 2x15 sweetspot workout and a 7x3 L4/L5 workout.  And, I'll up my time in the saddle on the weekend Tempo ride from 2 hrs. to 2.5 hrs.  In weeks 5-6 I'll continue to increase the progression of all workouts.  I'll do this up to the 7th week.  Then, I'll decrease the duration and increase the intensity of the interval workouts.  Here's where I'll start the HIIT intervals (add some Tabata intervals).  Week 8 is sort of a taper of the volume (time)..where I'm not going very hard either.  I'm just going to maintain my fitness and form and be ready for the ride in week 9.  There it is, easy peasy.  You can follow the same training protocol if your 'ride' is a 'race' instead.  My rides like this are not beach cruiser rides.  I ride hard trying to maintain a specific average speed or power.  Not sure what my goal will be for this ride yet.  I'll make that determination the closer I get to the ride. Good Luck with your training.

Power ON!  Coach Rob

Sunday, January 28, 2018

Winter Tires

I've been riding my bike every weekend throughout the Winter (weather permitting).  Weather permitting means unless it's raining or snowing or below 32F- I'm riding.  In addition to the salt on the road there is an over-abundance of gravel.  I'm sure there is some glass mixed in with that gravel too.  Just like your car should have all-season tires in the Winter (as a minimum), so should your bike.  I ride with Continental Grand Prix 4-Season tires and I love them.  They're constructed with Duraskin and a double Vectran puncture-resistant belt and reinforced sidewalls that stand up to brutal conditions.  They're also made with a rubber composition that performs well in cold temperature.  It's a great Winter/early-Spring tire.  I take them off when I ride in the Summer/Fall.


It's also a great tire for riding dirt/gravel roads like the Hell of Hunterdon bike ride in March (in my area).  In the Spring/Summer, I swap the Continental 4 Season tires for the Continental Grand Prix 4000 II tires.  They're not as stiff, they're lighter and they have great wet weather traction.  They're made in Germany where they know a little bit about automotive products (BMW, Mercedes Benz, Porsche, Audio automobiles not to mention Michelin and Continental tires).

Power ON!  Coach Rob

Tire size

I'll bet if you ask 90% of amateur bicycle riders what size tires they ride on, they'll give you the 'deer in the headlights' look.  They'll have no clue.  They probably don't care either- unless you told them if they chose a wider tire they'd probably ride faster with more comfort.  Really?  Yep.  Wider tires require less pressure to support the same weight.  Thus, wider tires can be inflated at lower pressures than narrower tires which yields more comfort.  What about speed?  Wider tires don't have any more total surface contact than narrower tires.  But, the fact that wider tires are not as tall as narrower tires means there is less deflection (up/down) yielding less tire rolling resistance.  Less rolling resistance equates to faster speed.  See Chart below:


If you've ever owned a high performance car with low-profile tires you'll know that the ride is not as comfortable as say a regular sedan with narrower tires.  That's because the low-profile tires are built for performance/handling- not comfort.  Same thing with bike tires.

  The majority of bikes sold pre-2016 were sold with stock 700x23c bike tires mounted on 15mm rims.  The 700 tire number is the diameter of the tire in mm, the 23 tire number is the tire width in mm (un-inflated).  So, based on what I said earlier, why doesn't everyone just go out and buy wider tires for their current bikes?  The problem with that is when you put a wider tire on a narrower rim you create turbulence from the wind which negates any of the rolling resistance advantage.  When wind hits the front (or slightly from the side) of the wheel, you want it to hug both the tire and the rim (as shown on the bottom right view).  You can see that with the wider tire and narrower rim below (on the bottom left) the wind separates from the rim causing turbulence.


That's why the trend these days is towards wider rims and wider tires.  So, if I have a 700x23c tire mounted on a 15mm rim, is there anything I can do to reduce the deflection and decrease rolling resistance making me go faster?  Yes, there is, you can slightly reduce the amount of pressure in your tires.  When I first started riding 15 yrs. ago (and using 700x23c tires) everyone pumped their tires up to 120 psi right before their ride.  The belief was the harder the tire the less tire to road surface area contact and the lower the rolling resistance.  Today we're smarter, we know that by lowering the tire pressure (down 5-10 psi) we can reduce the amount of deflection, decreasing rolling resistance and making us go faster.  Here is a chart from Michelin with recommended tire pressure based on wheel/tire size and rider weight.  You can see that the wider tires allows the tire pressure to be lowered almost 15 psi for the same rider weight:


The benefit of lowering the tire pressure is increased comfort.  You may not notice that comfort increase on a 20-30 mile ride or in a short race, but you'll definitely notice it for a century ride or longer race.  Instead of pumping my tires up to 120 psi, like I used to, I keep them between 105-110 psi (I weigh 160 lbs.).  I definitely notice more comfort.  I'm not sure I notice any more speed from decreased rolling resistance.  But, I'm not supposed to because when we talk about going faster, we're talking only seconds in a 40k TT.

Also, with the wider tires (that have shorter sidewalls) comes better bike handling, just like an high performance car with low-profile tires.

Power ON!  Coach Rob

Tuesday, January 23, 2018

How to choose the right bike frame size

There are plenty of ways to size a bike frame to yourself.  Notice I said 'size a bike frame to you', not the other way around.  When you purchase a bike, the bike should be custom fitted to you, not the other way around.  One of the best websites I've seen on how to fit a bike frame to you, is the Fit Calculator on Competitive Cyclist website: www.competitivecyclist.com 

You'll need a tape measure, stool, a bubble level and someone to take the measurements.
You'll need to take 8 measurements.  What's nice about the Competitive Cyclist Fit Calculator is that is shows you how to correctly take the measurements with both a photo and a video.  It doesn't get any easier/better than that.  You can take your measurements in either inches or centimeters.  I'd take it in inches since most tape measures are in inches. 

Here are the 8 measurements you need to take (I've included my measurements):

Inseam- 32"
Trunk- 24"
Forearm- 13"
Arm- 27"
Thigh- 23"
Lower Leg- 23"
Sternal Notch- 58"
Total Height- 71"

After taking my measurements, I entered them into Competitive Cyclists Fit Calculator.  Competitive Cyclist gave me 3 different results (for 3 different fits): a Competitive Fit (for aggressive riders or racers looking for speed over comfort), an Eddy Fit (less saddle to handlebar drop for more comfort), and the French Fit (puts you in a more upright riding position for maximum comfort and the largest frame).  Out of curiosity, I included the measurements from my Trek Madone 5.2 road bike (which is the same bike Lance Armstrong used to ride- so it's a race bike).  I was dumbfounded by the results.  It seems like my Trek Madone is a combination of all 3 fits..ha.  (see yellow highlights)  Go figure.


BTW, Trek recommends frame sizing from height alone.  According to the Trek sizing chart, I could ride either a 56cm or a 58cm size frame.  Since I'm 5'11" tall, I'm in the middle.  Too bad they don't sell a 57cm size frame.  I believe I opted for the 58cm size frame.  Perhaps that's why my bike measurements span all three of Competitive Cyclists Fits.  Now I'm wondering if my seat/saddle height is a little too low (BB Saddle position).  That would definitely put me in a more aero position when I'm in the drops.  Also seems like I can move my seat up a tad, which would decrease my saddle setback.  I'm not doing anything right now, because I'm comfortable when I ride and seem to be producing optimum power...for an old guy.

Power ON!  Coach Rob

Sweet Spot Training

What is Sweet Spot Training (SST)?  Before I define SST, I thought it best to explain why it's so important to perform this kind of training- if you want to get stronger on the bike.

When you train or workout, there are six or seven (depends who you talk to) training zones that you can workout in.  They are as follows:

Zone 1- Endurance or Active Recovery
Zone 2- Aerobic Capacity
Zone 3- Tempo
Zone 4- Threshold
Zone 5- VO2max
Zone 6-7- Anaerobic Capacity

Each one of these training zones has a different physiological effect that your body adapts to.  This chart best describes the adaptations:


You can see that the Zone between Zones 3 and Zones 4, called the "Sweet Spot" zone, (highlighted in orange) offers the most physiological adaptations.  i.e. the best bang for the buck.  This zone looks like Zone 3.5 (below the Threshold zone).  

So, why is it called the SST zone?  The term or nickname 'Sweet Spot Training' was coined by Frank Overton and Dr. Andy Coggan.  The underlying principle of sweet spot training is a balanced amount of intensity and volume that produces a maximal increase in an athlete’s functional threshold power (FTP). In the figure below, the “sweet spot” occurs between a high level/zone 2 and level/zone 4. It is within these ranges that you will build your base the most and simultaneously increase your power at threshold. More bang for your buck, and thus the nickname, “sweet spot”.


As a time crunched athlete, of which I believe 90% of amateur riders are, at least one interval workout per week should be devoted to SST.  BTW, I designate an SST workout as an L3/L4 workout.  Another interval workout should be a Threshold workout like a 2x10 or 2x15@L4.  As you get closer to your racing season, you'll want to add in a VO2max workout such as a 5x4@L5.  That is, if you want to increase your FTP and get stronger on the bike.  As I said before, these (SST) workouts are the best bang for the buck, and they're not as hard/painful as pure Threshold or VO2max workouts.  I don't believe time crunched athletes should do any specific Tempo L3 workouts.  Your long ride on the weekends (which you should be riding 3-4 hrs.) incorporates plenty of L3 Tempo miles.

There are plenty of SST workouts on the internet to choose from, just Google Sweet Spot Training Workouts.  If you're a Zwift member or ErgVideo user, there are plenty of SST workouts to choose from.  My favorite are the Over/Under SST workouts where you're bouncing back/forth between the upper and lower bounds of the SST range.  You're really not in L4 Zone long enough to be considered a Threshold workout but you're getting all the physiological effects/adaptations.

Power ON!  Coach Rob

Sunday, January 21, 2018

Virtual Reality Cycling


When I started indoor training (years ago), Racermate software (that came with my Computrainer) was as good as it got.  It was the closest thing to virtual reality software, with an avatar of bike rider on the screen with sub par graphics.  Then along came Erg Video virtual reality cycling software.  Erg Videos were provided (or rather sold) on DVDs.  They were real HD videos shot from a car/van and/or a rider from the back of a pack.  Each DVD cost $45.  You could buy Erg Videos of most of the Tour de France mountain climbs.  You could also buy a video of Lake Placid (one of my favorite bike rides) and a video of Threshold workouts...all in High Definition (HD).  I bought six of them for $270.  So, how do they work?  Once loaded on my PC and synced to my Computrainer, I was able to follow a pack of 5-6 riders from some riding club in Canada (forget their name).  As they would ascend a climb, the resistance in my Computrainer would automatically increase, thus virtual reality cycling.  It also allowed multi-rider cycling.  It was pretty cool I guess, but you get bored of the same old rides, which is why I bought six different DVDs.  Plus, the view doesn't change, you're staring at the asses of male riders in front of you the entire ride- bleh.  Today, Erg Videos (just like everything else) can be downloaded so you don't have to bother with DVDs.  ErgVideo software just released version 5- for free.  The latest with ErgVideo 5 is offering free training plans (the bait) that can be synced to your Videos (the catch).

For example, if I want to do a 2x20 threshold workout, from a free training plan, Erg Video will check my library of ErgVideos to see if any of the rides does a similar workout.  If it does, it will list which Videos in my library has an applicable workout.  ErgVideo calls this "Training Objective Equivalent" or TOE.  (C'mon man, you couldn't come up with a better acronym than that?)  Once I choose the TOE ride, I'm able to do a 2x20 workout staring at the asses of the same guys I followed all too many times before.  If I don't have a TOE video/ride, I can either do the workout in "free mode"- which means you just see a screen on your computer or display monitor with the power profile on it (like the old Racermater software days) or buy an Erg Video that does.  That is, for another $45. Remember the catch?  Once the workout is completed, the data can automatically be uploaded into Strava, Garmin Connect, Training Peaks, etc. for post-ride analysis- which is nice.  I never had a choice before with ErgVideo 3.  It was either upload to Training Peaks WKO or nothing.  I don't do Peaks WKO anymore, I ditched it, since they wanted another $179 for a new version.   Now, I use Golden Cheetah software instead.  Golden Cheetah is open source (free) software, and it does everything that Training Peaks WKO does and more.

So, there you go.  In a nutshell, that's the new release of ErgVideo5- offering free training plan workouts and the ability to tie into your ErgVideo library with a TOE video/ride.  Do I think ErgVideo virtual reality cycling software is as good as the Zwift experience?  Not even close.  Zwift does so much more: training rides, workouts, races, fun rides, etc.  And, you're riding against real people from all over the world.  And, you can change views...you don't have to stare at the ass or back wheel of the rider in front of you like ErgVideo. 

I'll do a comparison blog in the future of ErgVideo vs. Zwift.  What I do like about ErgVideo is if you always wanted to say ride the Alpe D'Huez, and you know you'll never get to France, it's the next best thing to being there.  Like I said, the videos are HD videos of the real deal.  Also, if you're a Triathlete and you're going to be doing IM Lake Placid, I highly recommend you buy their IMLP Ergvideo.  It's the next best thing to being there and it will help you train for your event- provided you have a smart trainer.  I think that's where ErgVideo really shines.

Power ON! Coach Rob

Friday, January 19, 2018

Zwift Workout Editor/Creator


Zwift virtual reality software continues to impress me.  If you don't like the FREE workouts offered in Zwift at https://whatsonzwift.com/workouts/ you can create your own, or edit an existing workout using this program zwofactory.com  It's a really cool program created by Matt McNeil.  It's simple to use.  Matt has instructions on zwofactory.com on how to use his program.  And, it too is FREE.  See below.  Once you're done editing or creating a new workout, you can save it to a My Workouts folder for downloading at a later time.  When you want to do the workout, you just go to your 'My Workouts' folder and upload your workout file into Zwift's document folder on your PC that runs Zwift.  That folder can be found at: Documents\Zwift\Workouts.  When you open up Zwift software and get ready to ride, you just go to Custom Workouts and your new file should be waiting for you.  


I created a 2x10@L4 workout using Matt's Zwofactory.com software and it couldn't have been easier.  I think it took me a whopping 5 minutes to create.  Thank you Matt for the easy to use software.  As the Brit's would say: Brilliant!

Now I know why I've been getting emails from ErgVideo lately offering me FREE training plans.   (ErgVideo probably sees Zwift just dominating the indoor cycling training market and they want to continue being a market leader themselves.)  ErgVideo has a new ErgVideo 5 software that is FREE.  ErgVideo 5 is tying their FREE training plans together with their ErgVideos.  That way, I can choose a FREE training plan and have it sync with one of my ErgVideos to get a real life workout.  Pretty cool since I have a nice library of about 7 ErgVideo CDs.  Sounds like a future blog.  For now though, I'm super happy with Zwift and all the developers like Matt McNeil who are making it easier and more fun to use and workout.

Power ON!  Coach Rob

Thursday, January 18, 2018

Zwift Interval Workouts

Indoor interval workouts have really changed over the years with the introduction of smart trainers and virtual reality cycling training software such as Zwift.  It's changed for the better.  When I first started coaching, before virtual reality software and smart trainers hit the scene, the only way to do indoor interval workouts was with a good power meter (or power meter trainer such as a Computrainer) to measure power output (in watts) and a stopwatch to time the interval.  So, if I were to do say a 2x20@L4 interval workout, I'd have to calculate my power zones, then I'd have to dial in the power/resistance I wanted my computrainer to maintain, then have the computrainer maintain that power on my Computrainer during the timed interval with my stopwatch.  Saving the workout and getting a printout of the workout with cadence, heart rate, power, speed, etc. took some effort.

Today, doing the same interval workout is automatic with virtual reality software such as Zwift.  In fact, Zwift does everything for you except pedal.  You just start the Zwift software, select a workout from the menu (of over 500 workouts) and go.  The following is a workout I chose to do tonight. It's an L4 (Threshold) workout from Zwift called "Threshold Pushing"


It's essentially a 2x12@L4 workout.  Zwift knew that my latest FTP was (210w) so it automatically calculated my power intervals for me.   You can see that the power ramped up from 100w to 150w then back down to 100, then up to 200w, etc.  When you start the interval workout, Zwift automatically sets the resistance on the smart trainer and shows you the watts you should be generating.  If you're pedaling over or under the specified power, Zwift will tell you to power up or power down.  It's got a stopwatch built-in that tells you how long you have to maintain the current power.  Like I said, everything is automatic.  And, all the data you ever wanted to know (except average power) is projected on the screen while you're doing the workout.  (BTW, Zwift is working on projecting the average power on the display/monitor.)  When you'e done the workout, it's automatically saved in Garmin Connect and Strava for later analysis and printout.  At least it is on my computer it's automatically uploaded and saved.  From there, you can get a graph of the workout.  If you did the intervals correctly, the output (below) should look like the chart above.  Here's my output:

You can see that my power output pretty much mirrors the Zwift chart.  Both, 12 minute L4 intervals are perfectly flat averaging 190w.  That's what you want.  You don't want to see any drop in power on the 2nd interval.  I like being able to overlay my heart rate (see red line).  You can see my heart rate creeped up at least 8bpm on my second 12 minute interval.  That happens as you get tired/dehydrated, etc.  I was exhausted by the end of the 2nd interval and that's what you want to be after most workouts on your trainer.  The only thing I don't like about some of these 'canned' workouts is that it spends too much time in a warm-up and cool-down.  I don't need to be warming up and cooling down for 1/2 hr.  Ten to fifteen minutes warmup is fine for the warmup and 5 minutes it fine for a cool-down for me.  That's the beauty of Zwift, it will allow you to modify/edit these workouts.  I haven't done that yet but it's a good topic for a future blog.

I'm telling you, if you're serious about indoor training, Zwift and a smart trainer is the ticket.  It's so easy to do interval workouts....and a lot more fun than the old days.  You don't even need a coach anymore.  (You didn't hear that from me).  There are enough workouts/plans on the Zwift menu to keep you busy for years.  Want to increase your FTP?  There's an FTP program/plan in Zwift for FREE.  Back in the day, you had to pay for these workout plans, and they weren't cheap.

Power ON!  Coach Rob

Wednesday, January 17, 2018

Is your seat height correct?

When was the last time you got measured/fitted for a bike?  Did you ever have a correct bike fit to begin with?  I'll bet the majority of bike owners never had one...or at least a correct one.  What is a correct bike fit?  Good question.  There must be at least 100 different bike fit protocols out there today.  Which one is the gold standard is beyond me.  Every one of them claims they're better than the other.  As a scientist/engineer, I naturally gravitate towards the more scientific approaches.  But, even that, there are just too many variables to consider. i.e. leg length discrepancy, height, weight, body physique, comfort, power output, endurance/duration, etc.  Not only does that run into time issues it runs into money issues. i.e. it costs too much to get a bike fit.  I've known some riders to have paid hundreds of dollars for what they believed was a 'correct' bike fit only to change it themselves because they were too uncomfortable when riding or started feeling pain in their knee that they never had/experienced before.

Also, what if you have 3 or more bikes like I do?  Should they all be fitted the same and have the same seat height?  Well, that depends.  Generally, Mountain bike seats are a little lower than road bike seats because of the constant stop and go when trail riding.  But, what if you just ride your mountain bike on dirt or chip seal roads like you would a road bike?  In that case, you'll want to make sure your seat height is the same as your road bike.  What about a Time Trial Bike?  Most of those bikes put you in a more forward position for  optimum aerodynamics.   How about an indoor trainer bike?  Should that seat height be the same as your road bike that you ride outdoors?  I think so.

What's the best way to ensure your seat height is at the correct position?  I think the simplest/quickest and best way is to place your pedals at the 6 and 12 o'clock position.  Actually, the bottom pedal should be more inline with the seat tube which will make the bottom position more of a 5 or 7 o'clock position (depending on which side of the bike you're looking) rather than 6 o'clock.  Now, sit on the bike (with your riding shoes on) and place the heel of your foot in the middle of the bottom pedal.  When your leg is fully extended (and your hips are level over the seat), that is the seat height you want to measure and record.  (A good place to do the seat height measurement/check is with your bike attached to an indoor trainer so you can ensure the bike is upright and level.)  The 'official' seat height is the distance from the middle of the bottom bracket (where the pedal crank is attached) to the top/middle of the seat. (See figure below).   I would measure with both legs because I've found as much as 1 inch of leg length discrepancies with some athletes.  What do you do if that's the case?  Well, I'm not a fan of shimming the shorter leg/shoe because the body has a way of compensating for this discrepancy.  Shimming a shoe might create problems that never existed before.  If it's an inch discrepancy, I'd split the difference.  Save the seat height measurement for future reference.  What I like to do is place some electrical tape at the bottom of my seat post, where it's inserted and clamped to the top of the seat tube.  That way, I can tell if my seat loosens and drops throughout the riding season.  If you have an all composite bike frame, be sure you have the correct torque value for tightening your seat post.  You don't want to crack the frame from over-tightening.


What if you have 3-4 different bikes?  I'd set them up the same. i.e. same height.  That is, the seat heights would be pretty close across all 3.  The only bike I'd adjust up/down would be my mountain bike.  If I'm riding the trails, I want the seat a little lower in case I have to clip out or step out quickly.  If I'm riding the mountain bike on a gravel road or dirt road, I want the seat height raised the same as my road bike.  That's why just about all mountain bikes have a quick adjust bolt to raise and lower the seat.

A correct seat height will allow you to ride longer and push harder generating more power..and more importantly it will prevent any pain in your legs or injury.

Power ON!  Coach Rob

Tuesday, January 16, 2018

Baby it's cold outside...indoor vs. outdoor training workouts.


There are many pros/cons of training indoors vs. training outdoors (and vice versa) in the Winter.  Which one is better?  I'll note the obvious pros starting with training indoors:
a. Quicker to just jump on the trainer and go.
b. Easier to jump on a trainer that's already set up ready to go.
c. Safer riding on a trainer indoors than riding outdoors on the sloppy roads.
d. No getting dressed (no gloves, hats, etc.) to train indoors.
e. Can watch TV/listen to music while training indoors.
f.  Can join online virtual reality races like Zwift.
g. Can train at any time indoors...day or night.
h. No worries about flats or other mechanicals you normally experience outdoors.
i. Don't have to worry about the weather..snow, sleet, rain, etc.
j. Don't have to worry about bike getting all slopped up with salt, mud, dirt, etc.
k. Rest rooms, water, food, shower, etc. are only seconds away.
l.  Can regulate temperature with a fan.

Ok, now the benefits of training/riding outdoors in the Winter:
a. There is no substitute for the feeling/balance/control/handling/etc. required to ride outdoors.
b. Hills! Hills! and more Hills!  A trainer can't replicate hills like the real thing unless you have a trainer that inclines and allows the bike to sway from side-to-side like it normally does when you climb hills outdoors.
c. Logistics- when riding outdoors you learn to become self-sufficient and learn what to wear, carry and not carry...including clothes, food, water, tire repair tools, etc.  You also get used to the weight of all your winter clothing, water bottles, food, etc. that you carry.
d. No substitution for learning to ride in the wind/cold/rain.
e. You can ride with a group- safety in numbers and more social than riding alone indoors.
f. You can coast on the road, you can't coast on a trainer- it stops when you stop (pedaling).
g. Specificity of Training

If I kept going, and I had to count the number of pros for each (Indoors vs. Outdoors), I'm sure I could find twice as many pros or reasons to train indoors vs. outdoors.  So, why not just train indoors all Winter?  The #1 advantage (or pro) in my mind for training outdoors is "Specificity of Training".  In fact, Specificity of Training trumps all the other pros of training indoors.  Specificity of Training states: "if you want to get better at something, you have to practice or train that specifically.  If you want to be a better bike racer, you better spend a good amount of time riding your bike- not trainer."  It's no different than training outdoors for an upcoming Time Trial vs. a Road Race.  If you want to get better at Time Trialing, you better ride/practice a lot on your Time Trial Bike vs. your road bike..and vice versa.  That's why I used to tell all of my athletes that I coached (that raced), "there is no substitute for riding on the roads outside in all kinds of weather- which includes the rain".  Those athletes that did train and ride in the cold and rain were the ones that did well come race season when it was cold and it rained during a race.  Why?  Because they were ready for it..physically and mentally..and they were confident in their bike handling skills unlike those that never rode or raced in the cold or the rain. 

So get out there and ride this Winter..as much as you may not like it.  It will pay dividends this upcoming race season.  Trust me.  Power ON!  Coach Rob

Wednesday, January 10, 2018

Did you get your flu shot this year?


Did you get your flu shot this year?  I just did.  Better late than never huh?  Unless you've had your head in the sand the last couple weeks you may have heard that this is the worst flu season nationally in quite some time.  Numerous people have died in California alone since November.  And, it's not just the young and old that's affected..it's any age.  Just this weekend a healthy 21 yr. old aspiring personal trainer from Western Pennsylvania died.  He was coughing and running a fever..that's it.  He had some mild chest pain.  He thought he could just rest and ride it out..instead he died.

You'll read reports that this years flu vaccine is only 10% effective.  That's not entirely true.  Each year vaccine manufacturers travel to the Far East and Australia to sample thousands of people to predict which viruses are likely to spread to the USA.  Their vaccines target the best guesses.  Each vaccine targets 3 or 4 types of the Flu.  This year, 2 of the 3 most common strains vaccinated against were accurate guesses.  People who were vaccinated are 70% immune from those 2. One strained missed, and you're only 10% immune to that one.  So, you're definitely better off getting the flu shot than not.

I read an interesting article/study the other day that said if you exercise for 90 minutes after receiving your flu shot, it will improve the efficacy/potency of the shot.  That is, it will make your immune system even stronger.  They said it has to be 90 minutes, not 30 minutes or 60 minutes.  Google it.

So, what can you do to decrease your chances of getting the Flu?  First, get the Flu vaccine.  It's not too late.  I read another interesting article the other day that said that people who get routine annual Flu shots are less susceptible of getting the Flu than those that get a Flu shot every blue moon.  Secondly, stay away from anyone sneezing or hacking up hair/flem balls.  If they're at work, tell them to go home before they infect the entire office.  Thirdly, wash your hands often and keep your hands away from your face.  Fourthly, drink plenty of fluids and get plenty of sleep.  Fifth, continue to exercise at a moderate  intensity.  If you do workout, workout at home.  Gyms are a petri dish of germs during the Flu season especially if you're a member of the YMCA that has kids.  Flu season is not the time for intense workouts that may weaken your immune system.  If you do get sick, monitor your temperature.  Take Tylenol or Ibuprofen.  If you're coughing, have aches and pains and have a fever for more than a day..go to the doctors.

Stay healthy my friends.  Power ON!  Coach Rob

Saturday, January 6, 2018

Overtraining and Heart Rate Variability (HRV)- Part III


Ok, you took your first and second HRV test and your reading says 6 (see above).  BTW, that's what mine said this morning.  What the hell does that mean?  If you remember, in Part I, your autonomic nervous system is made up of a sympathetic branch and a parasympathetic branch.  And, that these two branches of your nervous system were/are in constant competition. Thus the variability in your Heart Rate.  You can see the needle on the gauge is bordering on the yellow/green areas of the gauge.  That's telling me my sympathetic nervous system is winning the battle and I'm stressed.  But, how can I be stressed when my last workout was 2 days ago and it wasn't a hard workout?  It was a sweetspot workout (L3/L4) that only lasted 45 minutes.  Well, chronic stress can be caused by a lot of things in addition to a training workout.  Stress can be caused by pressure at work, inflammatory foods, relationships, sleep, financial matters, personal matters, etc. or a combination of all of them.  For me, it's been a really stressful last couple of days.  I was busy at work, I didn't sleep particularly well, and my wife and I had to take our dog to the Vet to have emergency surgery to remove a squeeky toy she ate/digested.  That alone was enough to over-stress me.  Not to mention the $7,000 bill from the Vet.

So, what now?  There's no doubt I'm suffering from Chronic Stress..so it's really not a good time to be torturing my body with a hard workout.  In fact, if I did decide to do a hard workout today..on a stressed body..it could compromise my immune system and I'd end up getting sick with a cold.  Instead, it's probably better to rest than exercise.  I would, except I get a little antsy if I go more than 3 days without working out.  So, this is a great time to do an active recovery workout.  With an active recovery workout, you're really not "building" or gaining any fitness, you're just "maintaining" it.  And, that's fine for me right now.  So, instead of my customary L3/L4 "sweetspot" workout, I'll opt for an L2/L3 workout which is an Endurance/Tempo Zone workout for active recovery.  And, because it's lower power output I can go a little longer.  Instead of a 45 minute trainer ride, I'll opt for a 1 hr. ride.  You really shouldn't go any longer than 20 minutes for an active recovery ride but I'm trying to lose a couple lbs from all the overeating and drinking over the holidays.  The key with an active recovery ride is to keep the power output low.

What's next?  Obviously, the goal is to get my HRV gauge in the middle (green section).  You do that be resting and recovering.  In addition to curtailing your normal exercise regime, it's a good time to be eating quality foods and getting plenty of sleep and drinking fluids.  If you can, it's also a good time to do some guided breathing/meditation as this will help balance the nervous system and relieve tension and make you more relaxed...moving the gauge towards the parasympathetic side.  It will be interesting to see if the needle on my gauge moves to the right in the next couple days.  I'll let you know in a future blog.  Speaking of meditation, that will be the topic/title of my next blog.  Stay tuned.  Until then, Power ON!  Coach Rob

Friday, January 5, 2018

Overtraining and Heart Rate Variability (HRV)- Part II

As promised, I'm back to talk to you more about HRV and how to measure it.  In my last blog, I explained what HRV was all about and how effective it is at helping to predict or diagnose overtraining.  Now, I'm going to tell you what you need to buy/get in order to measure HRV.  The first thing you need is a good Heart Rate Monitor (HRM).  There are dozens on the market and they include finger monitors, optical arm bands, wrist watches, chest monitors, etc.  Obviously, the most accurate would be a wired monitor.  However, you'll only see them in a lab setting and most are cost prohibitive.  So, I'm not going to even talk about those.  Of the wireless HRMs, I believe the best are made by Polar.  Why?  Because they're the pioneers in athletic HRMs, and an industry leader with over 30 yrs. experience, and they seem to be one of the most accurate over the years..especially their wireless chest monitors.  I bought all kinds of Polar HRMs over the years, coded, non-coded, ANT+, Bluetooth, etc. and the best one for monitoring HRV is the H7 pictured below:

The Polar H7 HRM is Bluetooth compatible with smart phones and one recommended by the software App I use called EliteHRV.  You can buy it online for $50.  It's not Polar's top of the line HRM, the H10 is, but it does the job.  The H10 is firmware upgradeable, has twice the battery life as the H7, new measuring algorithm, and has internal memory for storing up to 8 hrs of activity. But it's nearly double the price of the H7.  If you have the $$$, I'd spring for the H10.  If you're on a budget or don't care about the enhancements, go for the H7.

The software App for my iPhone is EliteHRV.  They have a great website and a great .pdf file that you can download telling you everything you need to know about HRV.  Go to www.EliteHRV.com Best of all, the App is FREE!
I've just started using EliteHRV.  In fact, tomorrow is only my second morning HRV reading.  In order to get accurate data you need to perform daily HRV measurements in bed while lying down (when you wake up in the morning).  Yes, that means you have to wear your HRM to bed- no big deal.  I'll let you know what I think in Part III..after I take my 2nd consecutive morning HRV test.  Together with Strava's Form/Fitness/Fatigue Chart..I believe you'll have a better idea if/when you're overtraining.  Overtraining can set you back more than not training at all.  Power ON!  Coach Rob

Thursday, January 4, 2018

Overtraining and Heart Rate Variability (HRV)- Part I

I'm pretty sure most of you know what overtraining is?  Maybe you've experienced it.  Maybe not.  If not, here are the symptoms:

  • Persistent muscle soreness
  • Elevated resting heart rate
  • Increased susceptibility to infections
  • Increased incidence of injuries
  • Irritability
  • Depression
  • Loss of motivation
  • Insomnia
  • Decreased appetite
  • Weight loss
As an engineer, I wanted a more scientific way of measuring or diagnosing overtraining.  They (the experts) say when you overtrain, your resting heart rate increases (or is elevated).  I'm sure that's true.  The problem with measuring resting heart rate is that there are too many variables that can affect it from day-to-day such as: diet, amount of sleep, stress, time of day, position (sitting, lying, etc) you're in when taking resting heart rate, the monitoring device (heart rate monitor), etc. What I found is a better indicator of overtraining is Heart Rate Variability (HRV).  

Heart Rate Variability (HRV) is the variation in time between successive heart beats over a given period of time.  The time between beats is called R-R intervals measured in milliseconds.  The time between intervals, unbeknownst to me, is not constant.  That is, if your resting heart rate is 50bpm your heart doesn't beat 50 times in a minute at exactly 1 second intervals each time.  I thought it did. Sometimes it beats less than a second apart and sometimes it beats more than a second apart..just like the diagram above (0.97s between beats and 1.1s between beats).   But, the average over a minute period of time is one second between intervals. Why is that?  It's due to your Autonomic Nervous System (ANS).  Your ANS controls your nerves, muscles, glands, etc.  The ANS touches every process within your body.  It affects blood sugar, adrenaline, digestion, pupil dialation, heart rate and much more.  The ANS has two systems or branches: the Sympathetic Nervous System (SNS) and Parasympathetic Nervous System (PNS).  The PNS is your "rest and digest" branch and is responsible for muscle repair, decreased heart rate and lowering blood pressure.  The SNS branch is your "fight or flight" branch and is responsible for increased heart rate, increasing blood pressure, dilating pupils, making you sweat, etc.  Obviously, you want your ANS leaning towards the PNS branch..otherwise you'd be like a cat in a room full of rocking chairs- a nervous Nelly.  However, when it's time to perform, you want your SNS branch to kick in and take over and dominate.  So, the two branches are competing to keep you alive.  Thus, the changes in heart rate and Heart Rate Variability (HRV).  These changes are the ones we want to measure to help us determine if we're overtraining or not.

How do we measure HRV?  You can measure it with a good Heart Rate Monitor, such as the Polar H7 or H10 Bluetooth HRM and an App for your smartphone called "Elite HRV" which I highly recommend.  You can get the Polar H7 HRM online for $50 or the H10 for $85.  The Elite HRV App is FREE.

See Part II (coming soon) for a description of the Polar H7 HRM and the Elite HRV App.  Until then, Power ON!  Coach Rob